In most public descriptions of SMIL, the language is described as "allowing authors to bring TV-like content to the Web." However, one aspect of presentations commonly seen on television has been noticeably absent from SMIL: transitions such as fades and wipes. In SMIL 1.0, any representation of transitions had to be "baked into" the media itself and there was no method of coordinating transitions across multiple media regions and timelines. The purpose of this document is to specify the semantics and syntax for describing transitions within SMIL and other XML-based documents. Also, this specification describes a taxonomy of transitions based on SMPTE 258M-1993 [SMPTE] as well as a compact set of parameters which can be used to express this set of transitions. Although the majority of transitions described in this document are visual transitions, a number of transitions have audio equivalents and are equally applicable.
For example, consider a simple still image slideshow of four images, each displayed for 5 seconds. Using SMIL Timing, this slideshow might look like:
...
<seq>
    <img src="butterfly.jpg" dur="5s" ... />
    <img src="eagle.jpg"     dur="5s" ... />
    <img src="wolf.jpg"      dur="5s" ... />
    <img src="seal.jpg"      dur="5s" ... />
</seq>
...
Currently when this presentation plays, we see a straight "cut" from one image to another, as shown in this animated image. However, what we would like to see are three left-to-right wipes in between the four images: in between butterfly.jpg and eagle.jpg at 5 seconds, in between eagle.jpg and wolf.jpg at 10 seconds, and in between wolf.jpg and seal.jpg at 15 seconds. Therefore, we must define the following to our presentations:
After adding these two definitions, our example slideshow now looks like:
...
<transition id="wipe1" type="edgeWipe" subtype="slideHorizontal" dur="1s"/>
...
<seq>
    <img src="butterfly.jpg" dur="5s" ... />
    <img src="eagle.jpg"     dur="5s" transIn="wipe1" ... />
    <img src="wolf.jpg"      dur="5s" transIn="wipe1" ... />
    <img src="seal.jpg"      dur="5s" transIn="wipe1" ... />
</seq>
Now the presentations play as follows. First, at 0 seconds, we cut directly to butterfly.jpg. Next, at 5 seconds we begin a 1-second left-to-right wipe into eagle.jpg. Therefore, at 6 seconds, eagle.jpg is fully displayed and remains displayed for 4 more seconds until 10 seconds. At this time, we begin a another 1-second left-to-right wipe from eagle.jpg to wolf.jpg. At 11 seconds, wolf.jpg is fully displayed until 15 seconds, when we begin another 1-second left-to-right wipe to seal.jpg. At 16 seconds, seal.jpg is fully displayed until 20 seconds at which time the presentation ends. This is visually illustrated by this animated image. Notice that these transitions occur during the timeline each of the images and do not add or subtract from their host timeline. In this case, the transition occurs at the beginning of the media element's timeline, although we will discuss later a method of placing the transition at the end of a media element's timeline.
This document is structured as follows. In the Transition Model section, we discuss exactly what transitions are and the two ways we will express them. In the Taxonomy section, we define a taxonomy of transitions and describe the families of transitions. Next in the Parameters section, we define a set of parameters which can fully describe all the transitions in our taxonomy. Next, in the Applying Transitions to Media Elements section, we describe the semantics of applying a transition class to a media element. Next, in the Multiple-Element Transitions section, we describe how to apply coordinated transitions across multiple media elements. Next, in the Integration section, we discuss issues related to integrating SMIL Transitions into other XML languages.
We will model transitions as the animation of a parameter d ("how much done") in a filter f(d). (@@Editor's Note: It would be nice to have a figure here.) This filter takes as input a "to" source, which is the media object the transition will be applied to. It also takes as input a "from" source, which is whatever media object(s) we are transitioning away from. We will abstract the value of d in our model to be in the range [0,1], where d=0 implies that the output of the filter is completely the "from" source(s) and where d=1 implies the output of the filter is completely the "to" source. All other parameters of the transition are assumed to be part of the filter itself. The parameter d is the only parameter which is animated.
This distinction between animating only the parameter d and animating other parameters is illustrated by the following. In the left-to-right wipe in the introductory example, we could either think of this transition as:
This may seem to be a very minor distinction for a left-to-right wipe, but then think of the corresponding distinction for a cross-fade. We could think of a cross-fade transition as:
In some cases, it would be very convenient to think of animating a particular property unique to each type of transition. However, that model does not generalize well across the broad variety of transitions currently in use today. Therefore, in order to maintain simplicity of this model, we think of both the left-to-right wipe and the cross-fade as "black boxes" which both take exactly the same inputs - the sources and d.
Transitions are hints to the presentation. Implementations must be able to ignore transitions if they so desire and still play the media of the presentation. Transitions do not alter the timeline of the media elements that are involved in the transition. Note that when speaking of "time" in transitions, we are really speaking of the parameter d and not the time of the presentation. Therefore, if we "speed up" the transition by accelerating the parameter d in the transition, we do not affect in any way the time of the presentation.
We will introduce two methods of specifying transitions:
Using CSS, making text appear in a certain font face and size involves defining a style and then using selectors to apply that style to the appropriate elements. The entire set of possible font faces are grouped into broad font families with specialization within each family. In a similar manner, we define in this section several broad families of transitions and describe the distinguishing characteristics of each family. In the next section, we will define a parameter set which can fully specify all the transitions in each family.
In all of the examples of specific transitions mentioned in this document, we will refer to the following model: we refer to the element being transitioned from as element A (or just A) and we refer to the element being transitioned to as element B (or just B). We define the following seven families (or types) of transitions:
Each of these transition "types" are further divided into many "subtypes". The table below lists the possible subtypes for each type. Also the table lists the mapping between the assigned name and the SMPTE Wipe Code (where applicable).
Transition type |
Transition subtypes (SMPTE Wipe Codes in parentheses) |
| edgeWipe | "slideHorizontal" (1) [default], "slideVertical" (2), "topLeft" (3), "topRight" (4), "bottomRight" (5), "bottomLeft" (6), "fourCorner" (7), "fourBox" (8), "barnVertical" (21), "barnHorizontal" (22), "topCenter" (23), "rightCenter" (24), "bottomCenter" (25), "leftCenter" (26), "diagonalLeftDown" (41), "diagonalRightDown" (42), "verticalBowTie" (43), "horizontalBowTie" (44), "diagonalLeftOut" (45), "diagonalRightOut" (46), "diagonalCross" (47), "diagonalBox" (48), "filledVUp" (61), "filledVRight" (62), "filledVBottom" (63), "filledVLeft" (64), "hollowVUp" (65), "hollowVRight" (66), "hollowVBottom" (67), "hollowVLeft" (68), "verticalZigZag" (71), "horizontalZigZag" (72), "verticalBarnZigZag" (73), "horizontalBarnZigZag" (74) |
| irisWipe | "rectangle" (101) [default], "diamond" (102), "triangleUp" (103), "triangleRight" (104), "triangleDown" (105), "triangleLeft" (106), "arrowheadUp" (107), "arrowheadRight" (108), "arrowheadDown" (109), "arrowheadLeft" (110), "pentagonUp" (111), "pentagonDown" (112), "hexagon" (113), "hexagonSide" (114), "cicle" (119), "oval" (120), "ovalSide" (121), "catEye" (122), "catEyeSide" (123), "roundRect" (124), "roundRectSide" (125), "star4pt" (127), "star5pt" (128), "star6pt" (129), "heart" (130), "keyhole" (131) |
| radialWipe | "top" (201) [default], "right" (202), "bottom" (203), "left" (204), "topBottom" (205), "leftRight" (206), "quadrant" (207), "topBottom180" (211), "rightLeft180" (212), "topBottom90" (213), "rightLeft90" (214), "top180" (221), "right180" (222), "bottom180" (223), "left180" (224), "counterTopBottom" (225), "counterLeftRight" (226), "doubleTopBottom" (227), "doubleLeftRight" (228), "vOpenTop" (231), "vOpenRight" (232), "vOpenBottom" (233), "vOpenLeft" (234), "vOpenTopBottom" (235), "vOpenLeftRight" (236), "topLeft" (241), "bottomLeft" (242), "bottomRight" (243), "topRight" (244), "topLeftBottomRight" (245), "bottomLeftTopRight" (246), "topLeftRight" (251), "leftTopBottom" (252), "bottomLeftRight" (253), "rightTopBottom" (254), "doubleCenterRight" (261), "doubleCenterTop" (262), "doubleCenterTopBottom" (263), "doubleCenterLeftRight" (264) |
| matrixWipe | "horizontal" (301) [default], "vertical" (302), "topLeftDiagonal" (303), "topRightDiagonal" (304), "bottomRightDiagonal" (305), "bottomLeftDiagonal" (306), "cwTopLeft" (310), "cwTopRight" (311), "cwBottomRight" (312), "cwBottomLeft" (313), "ccwTopLeft" (314), "ccwTopRight" (315), "ccwBottomRight" (316), "ccwBottomLeft" (317), "verticalStartTop" (320), "verticalStartBottom" (321), "verticalStartTopOpposite" (322), "verticalStartBottomOpposite" (323), "verticalStartLeft" (324), "verticalStartRight" (325), "verticalStartLeftOpposite" (326), "verticalStartRightOpposite" (327), "doubleDiagonalTopRight" (328), "doubleDiagonalBottomRight" (329), "doubleSpiralTop" (340), "doubleSpiralBottom" (341), "doubleSpiralLeft" (342), "doubleSpiralRight" (343), "quadSpiralVertical" (344), "quadSpiralHorizontal" (345), "verticalWaterfallLeft" (350), "verticalWaterfallRight" (351), "horizontalWaterfallLeft" (352), "horizontalWaterfallRight" (353) |
| pushWipe | "fromTop", "fromRight", "fromBottom", "fromLeft" [default] |
| slideWipe | "fromTop", "fromRight", "fromBottom", "fromLeft" [default] |
| fade | "crossfade" [default], "fadeToColor", "fadeFromColor" |
For each of the types, the first subtype is labeled as the "default" subtype. The purpose of this is to allow for a default transition for this transition family, if either the transition subtype is not specified or not implemented. This is a similar idea to CSS's font-family property, where the value is a comma-separated list of font faces of families. If the first font in the list is not available, then the browser tries the second. Usually, the last font in the list will be very generic, so that all browsers can support it. In the same way, authors can specify a type and subtype for a transition class. If this transition class is not available or not implemented by the user agent, then the user agent should fall back on the default subtype for that transition family. For more detail on parsing rules, see the Transition Parsing Rules section.
Now that we have a taxonomy of transition types and subtypes defined, now we must define a set of parameters which can span the entire space of transitions. In the following list, not all the parameters apply to every transition type. However, there is enough commonality between parameters for each family that it is not useful to have a separate parameter set for each transition family.
The transition element defines a single transition class. This element may appear in different places in the document, depending upon the language profile. However in most cases, the transition element will be in the head of the document. For clarity, a grouping "container" element (such as the layout element in SMIL) may be desired in order to group all of thee transition elements together. Since there may be multiple transition classes used in a document, then there may be multiple transition elements in the head of the document.
Element attributes
Element content
The transition element is an empty element.
For example, suppose we wanted to define two transition classes: a simple 2-second fade-to-black and a 5-second keyhole-shaped iris wipe. These transition classes can be expressed as:
    ...
    <transition id="ftb2" type="fade" subtype="fadeToColor"
                dur="2s" color="#000000" />
    <transition id="key5" type="irisWipe" subtype="keyhole"
                dur="5s" />
    ...
Transitions parameters can be specified incorrectly in many different ways with varying levels of severity. Therefore, the following errors should be handled with the specified action:
Once a transition class has been defined in the head of a document, then a transition instance can be created by applying the transition class to the timeline of a media object element. We do this by specifying a "transIn" or "transOut" attribute on the media object element. Transitions specified with a "transIn" attribute will occur at the beginning of the media element's timeline. Transitions specified with a "transOut" attribute will occur at the end of the media element's timeline.
The transIn and transOut attributes are added to all media object elements listed in the SMIL Media Object Module. The default value of both attributes is an empty string, which indicates that no transition should be performed. The value of these attributes is a comma-separated list of transition id's. Each of the id's should correspond to the value of the id attribute of one of the transition elements previously defined in the of the document. The purpose of the comma-separated list is to allow authors to specify a set of fallback transitions if the preferred transition is not available. The first transition in the list should be performed if the user-agent has implemented this transition. If this transition is not available, then the second transition in the list should be performed, and so on. If the value of transIn or transOut attribute does not correspond to the value of the id attribute of any one of the transition elements previously defined, then this is an error. In the case of this error, the value of the attribute should be considered to be the empty string and therefore no transition should be performed. For more detailed parsing rules, see the Transition Parsing Rules section.
Consider the slideshow example in the Introduction of the document with two additions: a fade-from-black is applied to butterfly.jpg at the beginning of the presentation and a fade-to-black is applied to seal.jpg at the end of the presentation. This presentation could be represented as:
...
<transition id="wipe1"      type="edgeWipe" subtype="slideHorizontal" dur="1s"/>
<transition id="fromblack1" type="fade"     subtype="fadeFromColor"   dur="1s"/>
<transition id="toblack1"   type="fade"     subtype="fadeToColor"     dur="1s"/>
...
<seq>
    <img src="butterfly.jpg" dur="5s" transIn="fromblack1" ... />
    <img src="eagle.jpg"     dur="5s" transIn="wipe1"      ... />
    <img src="wolf.jpg"      dur="5s" transIn="wipe1"      ... />
    <img src="seal.jpg"      dur="5s" transIn="wipe1" transOut="toblack1" .../>
</seq>
...
We will use this example to illustrate the following rules for applying transitions to media elements:
    ...
    <par>
        <img src="butterfly.jpg" dur="10s" region="foo"/>
        <img src="eagle.jpg" begin="3s" dur="4s" region="bar" />
    </par>
    ...
Assuming that region "bar" is z-ordered on top of region "foo", then transitions applied to both the beginning and end of eagle.jpg would have the visual appearance of being applied during the timeline of butterfly.jpg. However, from the authoring perspective, they are still applied at the beginning and end of eagle.jpg.
    ...
    <transition id="toblack1s" type="fade" subType="fadeToColor"
                   color="#000000" dur="1s"/>
    ...
    <par>
        <img   ... dur="10s" transOut="toblack1s" fill="freeze"/>
        <video ... dur="30s" transOut="toblack1s"/>
    </par>
the effective end of the <img> element is 30s. Therefore both elements fade to black together at 29s. However, in the following:
    ...

    <transition id="toblack1s"   type="fade" subType="fadeToColor"
                   color="#000000" dur="1s"/>
    ...
    <par>
        <img   ... dur="10s" transOut="toblack1s" fill="remove"/>
        <video ... dur="30s" transOut="toblack1s"/>
    </par>
the effective end of the img element is 10s. Therefore, in this case the img element fades to black starting at 9s and the video element fades to black starting at 29s.
    ...
    <seq>
        <video src="foo1.mpg" ... />
        <video src="foo2.mpg" transIn="xfade1s" ... />
    </seq>
    ...
the timelines do not overlap and therefore we are doing a crossfade between the last frame of foo1.mpg and active frames of foo2.mpg. In the following presentation (which uses SMIL Layout for illustration), however:
    ...
    <transition id="xfade" type="fade" subtype="crossfade" dur="1s" />
    ...
    <par>
        <video src="foo1.mpg" dur="30s" region="reg1" />
        <video src="foo2.mpg" begin="10s" dur="10s" region="reg2"
               transIn="xfadebeg" transOut="xfadeend" />
    </par>
    ...
crossfades both at the beginning and end of foo2.mpg are between active frames of both foo1.mpg and foo2.mpg.
    ...
    <transition id="awipe" type="wipe" dur="1s" ... />
    ...
    <par>
        <img src="img1.jpg" dur="2s" transOut="awipe" .../>
        <img src="img2.jpg" begin="5s" dur="2s"       .../>
    </par>
    ...
In this example, the timelines for img1.jpg and img2.jpg do not overlap. Therefore, img1.jpg will transition to the background color of the region.
    ...
    <seq>
        <img src="img1.jpg" dur="10s" ... />
        <img src="img2.jpg" dur="10s" ... />
    </seq>
    ...
the implementation knows that it can remove the object representing img1.jpg after 10 seconds. However, if we were using a transition between img1.jpg and img2.jpg, then we need the object for img1.jpg to remain until after the transition is completed and then it may be removed. This is a new kind of fill behavior and is specified by a new value for the fill attribute called "transition". In the above example,
    ...
    <transition id="awipe" type="wipe" dur="1s" ... />
    ...
    <seq>
        <img src="img1.jpg" dur="10s" fill="transition" ... />
        <img src="img2.jpg" dur="10s" transIn="awipe"   ... />
    </seq>
    ...
the implementation is instructed to keep the object for img1.jpg around long enough to complete the transition between img1.jpg and img2.jpg.
When we defined the transition element, we allowed for default transition subtypes. Also, when defining the "transition" attribute in media object elements, we stated that the value of this attribute is a comma-separated list of transition id's. The combination of these two definition gives rise to the possibility of ambiguity. Therefore, we must define a simple parsing algorithm for determining which transition should be performed. Given a list of transition id's, and one of more transition elements previously defined, implementations must use the following algorithm to determine which transition to perform.
current-id to the first id in the list.
current-id is empty (we have no more id's in the list), then
exit this algorithm. The implementation must not consider this an error and
must not perform any transition.
current-id the id of some previously defined
transition element? If it is,
then go to Step 4. If not, then set current-id to the next id
in the list and go to Step 2.
current-id , is the value of the "type" attribute known to
the implementation? If it is, then go to Step 5. If not, then set
current-id to the next id in the list and go to Step 2.
current-id , is the "subtype" attribute specified? If it
is, then go to Step 6. If it is not specified, then exit this algorithm.
The implementation must perform the default subtype transition for the specified
transition type.
current-id , is the value of the "subtype" attribute known
to the implementation? If it is, then exit this algorithm. The implementation
must perform the transition specified by the type and subtype. If it is not,
then set current-id to the next id in the list and go to Step
2.
In the algorithm specified earlier for determining which transition to perform, there is an implicit method for extending the set of transitions. If the new transition does not fall into any of the general descriptions of transition families in the Transition Taxonomy section, implementations may create a new transition type (a new family of transitions) and then create new transition subtypes under that newly-defined type. However, it is recommended that if the new transition falls into one of the existing families of transitions, implementations should simply extend the set of subtypes for that existing type.
As mentioned earlier in the Transition Model section, we allow two methods of specifying transition: a shorthand method and inline. The previous section covered the shorthand method, and now in this section we specify the inline method.
First we introduce the transitionFilter element. This element will be a child of the media element (as opposed to being referenced in a "transition" attribute) and will be animated using the animate element of the SMIL Animation Module.This element essentially shares many of the same attributes with the transition element. However, since we will use this element to animate the parameter d (as discussed in the Transition Model section), then this element has an additional parameter ("percentDone") and does not have the shorthand-related parameters of the transition element ("startPercent", "endPercent", etc.)
Element attributes
Element content
The transition element is an empty element.
Examples of the transitionFilter element
Here we revisit our left-to-right wipe example from the Introduction section. However, this time we use inline transitions.
...
<seq>
    <img src="butterfly.jpg" dur="5s" ... />
    <img src="eagle.jpg"     dur="5s" ... >
        <transitionFilter type="wipe" subtype="slideHorizontal" dur="1s">
            <animate attributeName="percentDone" from="0" to="1000"/>
        </transitionFilter>
    </img>
    <img src="wolf.jpg"      dur="5s" ... >
        <transitionFilter type="wipe" subtype="slideHorizontal" dur="1s">
            <animate attributeName="percentDone" from="0" to="1000"/>
        </transitionFilter>
    </img>
    <img src="seal.jpg"      dur="5s" ... >
        <transitionFilter type="wipe" subtype="slideHorizontal" dur="1s">
            <animate attributeName="percentDone" from="0" to="1000"/>
        </transitionFilter>
    </img>
</seq>
...
This should produce a presentation which looks the same the introductory example which used the style-like shorthand.
Up until this point in the discussion, we have applied transitions to single media object elements. However, it is common practice to apply transitions across several different media at once. Consider the following presentation:
...
<seq>
    <par>
        <img src="back1.jpg"  dur="10s" ... />
        <img src="left1.jpg"  dur="10s" ... />
        <img src="right1.jpg" dur="10s" ... />
    </par>
    <par>
        <img src="back2.jpg"  dur="10s" ... />
        <img src="left2.jpg"  dur="10s" ... />
        <img src="right2.jpg" dur="10s" ... />
    </par>
</seq>
...

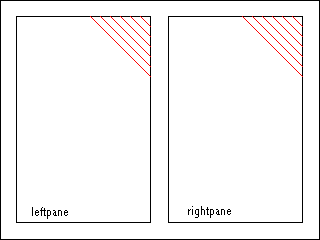
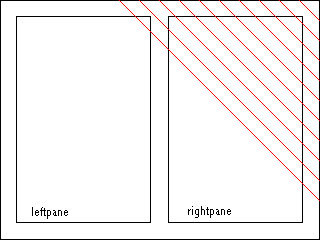
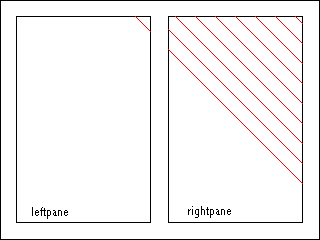
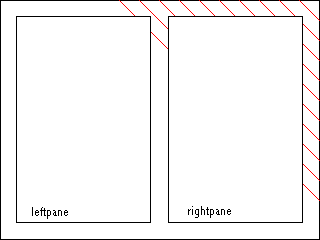
where left1.jpg and left2.jpg appear in "leftpane", right1.jpg and right2.jpg appear in "rightpane", and back1.jpg and back2.jpg appear in the area behind leftpane and rightpane. Suppose that we had defined a transition class called "diagwipe" to be a 1-second diagonal wipe from upper right to lower left. In this example, we consider 4 possible different cases of how we might want to apply this transition to this presentation:
 |
 |
Case 1 |
Case 2 |
 |
 |
Case 3 |
Case 4 |
Cases 1 and 4 are fairly straightforward, since they are applying individual transitions to individual media elements, which we discussed in the previous section. In Case 2 and 3, the diagonal wipe is a coordinated transition across all three media, where the geometry of the transition is calculated from the media in the background and not the individual media. Case 1 could be represented as:
...
<transition id="dwipe" type="edgeWipe" subtype="diagonalRightDown"/>
...
<seq>
    <par>
        <img src="back1.jpg"  dur="10s" ... />
        <img src="left1.jpg"  dur="10s" ... />
        <img src="right1.jpg" dur="10s" ... />
    </par>
    <par>
        <img src="back2.jpg"  dur="10s" ... />
        <img src="left2.jpg"  dur="10s" transIn="dwipe" ... />
        <img src="right2.jpg" dur="10s" transIn="dwipe" ... />
    </par>
</seq>
...
and Case 4 would look like:
...
<transition id="dwipe" type="edgeWipe" subtype="diagonalRightDown"/>
...
<seq>
    <par>
        <img src="back1.jpg"  dur="10s" ... />
        <img src="left1.jpg"  dur="10s" ... />
        <img src="right1.jpg" dur="10s" ... />
    </par>
    <par>
        <img src="back2.jpg"  dur="10s" transIn="dwipe" ... />
        <img src="left2.jpg"  dur="10s" ... />
        <img src="right2.jpg" dur="10s" ... />
    </par>
</seq>
...
In Cases 2 and 3, however, we want to execute a coordinated transition which includes the media in both "leftpane" and "rightpane". In Case 2 region and either have the media in "leftpane" and "rightpane" clip (Case 3) or not clip (Case 2) the transition. In order to express Cases 2 and 3, we need to introduce the concept of parent and children media. In Cases 2 and 3, the media in leftpane and rightpane are children of the media in the background. Therefore, when we place the transition on the parent media, the media which are children are automatically involved in the transition. In Cases 1 and 4, all of the media (leftpane, rightpane, and background) are peers - there are no parent-child relationships. Therefore, in Case 4, when we place the transition on the background, the transition is executed only on the background and not leftpane and rightpane, even though they are z-ordered on top of the background.
The exact syntax for expressing the concept of parent and child media depends on the host language. For instance, with SMIL Transitions integrated into HTML, the parent and child media might be expressed as nested div elements. When using SMIL Transitions with SMIL Layout, parent and child media can be expressed using having the region elements of the child media be children of the region element of the parent media. For more detail on parent regions in SMIL Layout, see the SMIL Layout Module.
Therefore, in order to execute Case 2 or 3, we must first specify the parent-child relationship between media and then specify that the transition is a multi-element transition. We do this by setting the "multiElement" attribute of the <transition> element to "true". Then, in order to distinguish between Case 2 and 3, we choose the value of the "childrenClip" attribute of the <transition> element. Therefore, for Case 2 (where the transition involves both parent and children), we set "childrenClip" to "false", and for Case 3 we set "childrenClip" to "true".
Now we can express Cases 2 and 3. Case 2 can be expressed as:
...
<transition id="dwipe" type="wipe" subtype="diagonalRightDown"
            multiElement="true" childrenClip="false"/>
...
<seq>
    <par>
        <img src="back1.jpg"  dur="10s" ... />
        <img src="left1.jpg"  dur="10s" ... />
        <img src="right1.jpg" dur="10s" ... />
    </par>
    <par>
        <img  src="back2.jpg"  dur="10s" transIn="dwipe" ... />
        <img  src="left2.jpg"  dur="10s" transIn="dwipe" ... />
        <img  src="right2.jpg" dur="10s" transIn="dwipe" ... />
    </par>
</seq>
...
Implicit in the above example is the parent-child relationship of media. We would have specified that elsewhere. If we were using SMIL Layout, then we would have made the region of back2.jpg be the parent of the regions of "left2.jpg" and "right2.jpg". Other layout schemes might use other means of specifying this parent child relationship. Case 3 is a trivial change from Case 2:
...
<transition id="dwipe" type="wipe" subtype="diagonalRightDown"

multiElement="true" childrenClip="true"/>
...
<seq>
    <par>
        <img src="back1.jpg"  dur="10s" ... />
        <img src="left1.jpg"  dur="10s" ... />
        <img src="right1.jpg" dur="10s" ... />
    </par>
    <par>
        <img  src="back2.jpg"  dur="10s" transIn="dwipe" ... />
        <img  src="left2.jpg"  dur="10s" transIn="dwipe" ... />
        <img  src="right2.jpg" dur="10s" transIn="dwipe" ... />
    </par>
</seq>
...
where all we have done is changed the "childrenClip" attribute to "true" in the definition of the transition.
The purpose of this section is to specify requirements and recommendations on the host language or profile in order to integrate SMIL Transitions.
<!ENTITY  % transition-attrs "
    type         CDATA        #IMPLIED
    subtype      CDATA        #IMPLIED
    horzRepeat   CDATA        #IMPLIED
    vertRepeat   CDATA        #IMPLIED
    borderWidth  CDATA        #IMPLIED
    color        CDATA        #IMPLIED
    multiElement (true|false) 'false'
    childrenClip (true|false) 'false'
">

<!ELEMENT transition "EMPTY">
<!ATTLIST transition ""
    %transition-attrs;
    dur          CDATA              #IMPLIED
    startPercent CDATA              #IMPLIED
    endPercent   CDATA              #IMPLIED
    direction    (forward|reverse)  'forward'
>

<!ELEMENT transitionFilter "EMPTY">
<!ATTLIST transitionFilter ""
    %transition-attrs;
    percentDone CDATA #IMPLIED
    begin       CDATA #IMPLIED
    dur         CDATA #IMPLIED
    end         CDATA #IMPLIED
>